
This is the beginning of my series on “Making A Memory Quilt”. Memory quilts are my favorites! A memory quilt is a great way to preserve cherished memories and commemorate special events. In this post I will list some steps to getting started and every week I will make a post that goes into each step in detail. I truly hope that you find this information helpful. If you have tips along the way, please share them so we can all benefit!
Steps to get started making a memory quilt:
- Gather materials: To make a memory quilt, you’ll need fabric for the quilt top, batting for the middle, and a backing fabric. Also gather any clothing, textiles, or other items that hold sentimental value to include in the quilt.
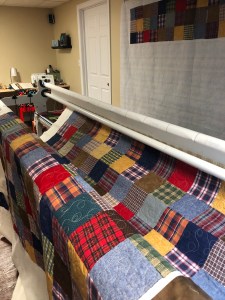
- Choose a design: There are many different designs you can use for a memory quilt. Some popular options include patchwork (see my photo above), photo quilts, and applique. I have included all of these on some quilts. It truly depends on your preferences and what you have available. You may also want to consider the size and shape of the quilt based on how many items you plan to include. If you don’t have enough memory items (shirts, etc.) then you can plan in additional fabrics to make the size quilt you would like.
- Plan your layout: Once you have your materials and design chosen, plan out how you want to arrange your items on the quilt. This may involve cutting the clothing or textiles into specific shapes or sizes.
- Interface as needed: Some fabrics will require additional preparation prior to cutting. For instance, T-shirts require a light interfacing to ensure they do not stretch while constructing or quilting.
- Cut your fabrics: Depending on your design, you may have different items of clothing, memorabilia, or fabric to cut.
- Piece together the quilt top: Using your chosen design, piece together the quilt top. This may involve sewing together fabric pieces, attaching photos, or appliqueing items onto the fabric.
- Add batting and backing: Once the quilt top is complete, layer it with batting and a backing fabric. Pin the layers together and quilt them by hand, with a sewing machine. long arm, or even bring them to a long arm quilter to be completed. Lots of options available!
- Make a quilt label: Your memory quilt will last for generations so let’s be sure that the memories and purpose are documented for the future! Don’t forget to include this information: Name of quilt, Name of piecer/quilter, Date quilt was completed, special notes about the person, event, or memories.
- Add the quilt label: In some cases the quilt label is completed and affixed prior to the quilting of the memory quilt. In other cases, you may wish to add the label directly prior to the binding or whip stitch it on after the binding. It is all a matter of personal choice.
- Binding: Once the quilting is complete, add binding to the edges of the quilt to finish it off.
I am super excited to be bringing this series to you and hope that you will create your own memory quilt. There are many ways to accomplish these tasks so I look forward to hearing from you with some tips and tricks!
Remember, making a memory quilt is a labor of love and can take some time and effort. Take your time, enjoy the process, and know that the end result will be a cherished keepsake for years to come.
