Memory Quilts

Memory Quilt – Cutting Shirts

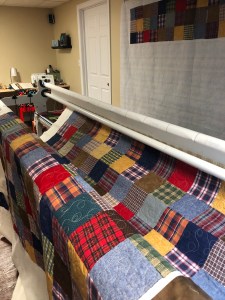
When making a memory quilt, the shirts could be of varying fabrics; button down dress shirts may be cotton or cotton/polyester blend and typically do not need to be interfaced. If you are working with stretchy materials – such as t-shirts, you will want to apply interfacing to stabilize the shirts and prevent stretching. While these are general instructions, keep in mind that there are many ways to cut and interface and it really comes down to personal preference. For instance, I like to interface after cutting, but some like to interface prior to cutting the shirts.

Cutting T-Shirts

  1. Choose the t-shirts you want to use: Start by choosing the t-shirts that you want to include in your quilt. These could be t-shirts that represent special memories or events, such as sports teams, concerts, or vacations.
  2. Decide on the size of your quilt blocks: Once you have chosen your t-shirts, you will need to decide on the size of your quilt blocks. This will depend on the size of your t-shirts and the overall size of your quilt. A common size for quilt blocks is 12 inches square, but you can make them smaller or larger depending on your preferences. I like to use every bit of the shirt that I can so I also include logos, front and back of the shirts.
  3. Cut your t-shirts: Once you have decided on the size of your quilt blocks, you can start cutting your t-shirts. Use a ruler and fabric scissors to cut the t-shirts into squares or rectangles that are slightly larger than your desired quilt block size. You can then trim them down to the exact size later.
  4. Stabilize your t-shirt fabric: T-shirt fabric is often stretchy, which can make it difficult to work with when sewing. To stabilize the fabric, you can use a fusible interfacing or stabilizer. Simply cut a piece of interfacing or stabilizer that is the same size as your t-shirt fabric and iron it onto the back of the fabric before cutting.

Cutting Dress Shirts

  1. Choose the dress shirts you want to use: Start by choosing the dress shirts that you want to include in your quilt. These could be dress shirts that represent special memories or events, such as weddings, graduations, or other important occasions.
  2. Decide on the size of your quilt blocks: Once you have chosen your dress shirts, you will need to decide on the size of your quilt blocks. This will depend on the size of your dress shirts and the overall size of your quilt. A common size for quilt blocks is 12 inches square, but you can make them smaller or larger depending on your preferences. If you are using a quilt pattern, please refer to the pattern instructions and plan your cuts accordingly.
  3. Cut your dress shirts: Once you have decided on the size of your quilt blocks, you can start cutting your dress shirts. Use a ruler and fabric scissors to cut the dress shirts into squares or rectangles that are slightly larger than your desired quilt block size. You can then trim them down to the exact size later.
  4. Stabilize your dress shirt fabric: Dress shirt fabric is usually more stable than t-shirt fabric, but you may still want to stabilize it to ensure that it doesn’t stretch or warp when you sew it. You can use a fusible interfacing or stabilizer to do this, just as you would with t-shirt fabric.

Honestly, I am late posting this segment because I had every intention of creating my own video on cutting shirts, but there are so many great ones out there already!

Here is a great video on cutting shirts by Lisa Capen of Lisa Capen Quilts. This is the very first video that I watched several years ago before I embarked on my first memory quilt. I absolutely love the way she teaches and can’t recommend her enough!

Lisa Capen from Lisa Capen Quilts – T-Shirt Quilt Along

Here is another great video on breaking down the cutting of dress shirts for memory quilts from Fallon at Sew Be It Quilts.

Fallon from Sew Be It Quilts and Create Beautiful Quilts

I really found these videos helpful and I know you will too! Until next time, keep stitching!

Quilt Labels

Embroidered Quilt Labels – Testing!

I have just spent nearly 8 hours testing interfacing and stabilizer for quilt labels. To be honest, I spent nearly two hours before that just trying to find what I need on Youtube and blogs. There was a lot of great advice and I think sometimes the results come down to your machine and the design. I thought it may be helpful to share my tests and results for others who may be researching this topic. And if you don’t want to make your own labels, please visit my Etsy Shop to see what is available! I truly enjoy making quilt labels that match your quilt and your personality! Let’s create something together! Now, on to the tutorial.

Here are the constants in each of the tests and this way you won’t find me repeating myself.

  • My machine is a Babylock Pathfinder (love it!) and a 6″ x 6″ hoop
  • Kona Cotton for the labels (I used white and snow (very light beige))
  • Glide embroidery thread (40wt) in various colors
  • The embroidery design I used is available at Embroidery Library
  • When I refer to “fusible mesh stabilizer” I am using Brothread from Amazon
  • When I refer to “P44F interfacing”I am using Pellon brand P44F from Amazon and you can also find it at your local Joann Fabrics or Walmart. Watch for coupons! And get it half price at Joann Fabrics!
  • I also used Tear Away and this is one that I used quite frequently and have had good luck with easy tearing!

Ok! So here we go with the embroidered quilt label experiment! I will not be going into how to fuse interfacing or stabilizer, but ask questions if needed!

Experiment #1

For this run, I used fusible mesh stabilizer with a water soluble stabilizer (WSS) on top. Everything stitched out great and I was super excited! I thought for sure this was the combination for me. As you can see in the pics below, it looked great just off the machine. then I had to spray it with water to remove the WSS and wait for it to dry. Then I had to press it because when it dried it was wrinkly and just did not look presentable. I like it, but was not totally impressed with the amount of time it took for all the steps and I didn’t think it looked its best.

Embroidered Quilt Labels

Experiment #2

The second experiment was with fusible mesh and a heat removable topping. Again, everything stitched out great, but removal of the heat removable topping was not as easy as it sounds (could have been me) and again, it required pressing once all the removal was complete. Again, I am not sure if I did something wrong with this topper, but I was not pleased with the final results at all. I will try the topper on towels and see if it behaves differently, but won’t try it for quilt labels again.

Embroidered Quilt Labels

Experiment #3

For the next experiment I used the fusible mesh and floated one layer of tear away stabilizer underneath. There was no puckering during stitching and the tear away was easy to remove. It should be noted though that some of the tear away remains in the label and will wash out during the normal washing process. I do remove the majority. This quilt label looked great right off the machine and after removing the tear away!

Embroidered Quilt Labels

Experiment #4

For the final experiment I used a lightweight fusible interfacing (Pellon P44F), which I applied first. Then I applied the fusible mesh and off to stitch! No puckering while stitching so I was very hopeful! I was even more hopeful when I took it out of the hoop. I can be lazy so extra steps, even removing tear away can be annoying. This quilt label looked great right off the hoop and with no additional steps!

Embroidered Quilt Labels

The results of experiments 3 and 4 have me hooked. I could go with either method and be very happy! Of course…4 may win because there are zero extra steps! What are your thoughts? Have you been experimenting as well? Do you have any favorites? Are there tips or tricks you would like to share?

I really do hope that you find this helpful! Happy Stitching!

This site contains product affiliate links. I may receive a commission if you make a purchase after clicking on one of these links.

Memory Quilts

Memory Quilt – Gather Materials

Memory Quilt Supplies

I am so excited you are here and that I have the opportunity to share my method for making a memory quilt. So let’s get started with gathering materials.

To make a memory quilt, you will need the following materials:

  1. Clothing or fabric: Choose the clothing or fabrics that have sentimental value to you or the person for whom you are making the quilt. This can be dress shirts, t-shirts, jeans; whatever is important for your project.
    • Be sure to wash and dry all clothing so it is ready for cutting. If you are using fabric to embellish your blocks, you may want to prewash and dry. I prefer to prewash and dry my fabrics when making memory quilts so that the added fabric does not shrink once the quilt is put together.
  2. Additional fabric: You may need additional fabric to enhance your blocks, to use as a backing for the quilt, or to create borders.
  3. Interfacing – I recommend Pellon P44F, which is a very lightweight interfacing and it will not add to the weight of your quilt. Not all fabrics need to be interfaced, but if you are using t-shirts or any fabric/material that stretches, then it should be interfaced.
  4. Batting: Batting is the soft layer that goes between the quilt top and backing to add warmth and comfort. Some prefer cotton, polyester or a polyester/cotton blend. My favorite batting is Warm & Natural cotton batting. And I also love Dream cotton batting.
  5. Thread: You will need thread in various colors to sew the fabric pieces together and to quilt the layers together. I keep staple colors for piecing; white, ivory, black, and light gray. However, if your fabrics are mostly black, you may prefer to use black. I sometimes use a darker gray if I have mixed darks and mediums. I do use all cotton thread for piecing. Some of my favorites are: Aurifil or Gutermann and don’t forget you will need bobbins to match!
  6. Scissors, snips, and rotary cutter: Scissors are necessary for cutting and trimming fabric, A rotary cutter is used for cutting and trimming large pieces of fabric. I keep snips at my sewing machine for trimming threads, but you can also use scissors.
  7. Cutting mat: Cutting mats provide a stable and safe surface for cutting fabric with a rotary cutter. I purchased a Fiskars Mat from Amazon and love it! It is double sided and easy to read.
  8. Rulers: Quilting rulers are a necessity to ensure that you have straight edges on your blocks so that everything stitches together nicely. I would recommend a straight ruler; I use a Creative Grids 6.5 x 24″ for cutting lengths of fabric. And depending on the size of your quilt blocks, you may want either a 12.5″ or 15.5″ ruler. If you have the 15.5″ or larger, it is very versatile and you can cut small to large blocks. For instance, if you are using baby clothes, then you may need to cut 6.5″ or 8.5″ unless you are combining clothing.
  9. Pins, clips, needles, marking pencils: Pins hold the fabric pieces together while sewing. I love these clips for holding fabric and especially for binding. Needles are necessary for hand-sewing (which I avoid at all costs!) and while I don’t expect to hand-sew, you may prefer to hand-sew you binding and the needles will come in handy in that case. For marking pencils/pens, chalk pencils or disappearing ink pens, etc. will work. You will want to test the pens/pencils with the fabrics you will use.
  10. Sewing machine: A sewing machine is used for piecing. We will only be using a straight stitch so you don’t need anything fancy! However, I would recommend a walking foot if you are planning on quilting your memory quilt on your sewing machine. You will have to do some research on which walking foot fits your machine prior to purchasing. Either your local dealer or manufacturer website is a good place to start.
  11. Embellishments: You may want to add additional embellishments like embroidery, appliqué, or quilting designs to finish the quilt. We will discuss all of these in future posts.

That’s it! Gather your materials and get ready to make a memory quilt that will be treasured for years to come. Next week we will discuss design so it will be helpful to know how many shirts you will be working with for your project.

Let me know if you have questions on any of the materials. If you don’t have something there may be a way to utilize something that you already have and I will do my best to help you with alternatives.

This site contains product affiliate links. I may receive a commission if you make a purchase after clicking on one of these links.

Memory Quilts

Making A Memory Quilt

Quilt Studio 62 -Memory Quilt

This is the beginning of my series on “Making A Memory Quilt”. Memory quilts are my favorites! A memory quilt is a great way to preserve cherished memories and commemorate special events. In this post I will list some steps to getting started and every week I will make a post that goes into each step in detail. I truly hope that you find this information helpful. If you have tips along the way, please share them so we can all benefit!

Steps to get started making a memory quilt:

  1. Gather materials: To make a memory quilt, you’ll need fabric for the quilt top, batting for the middle, and a backing fabric. Also gather any clothing, textiles, or other items that hold sentimental value to include in the quilt.
  2. Choose a design: There are many different designs you can use for a memory quilt. Some popular options include patchwork (see my photo above), photo quilts, and applique. I have included all of these on some quilts. It truly depends on your preferences and what you have available. You may also want to consider the size and shape of the quilt based on how many items you plan to include. If you don’t have enough memory items (shirts, etc.) then you can plan in additional fabrics to make the size quilt you would like.
  3. Plan your layout: Once you have your materials and design chosen, plan out how you want to arrange your items on the quilt. This may involve cutting the clothing or textiles into specific shapes or sizes.
  4. Interface as needed: Some fabrics will require additional preparation prior to cutting. For instance, T-shirts require a light interfacing to ensure they do not stretch while constructing or quilting.
  5. Cut your fabrics: Depending on your design, you may have different items of clothing, memorabilia, or fabric to cut.
  6. Piece together the quilt top: Using your chosen design, piece together the quilt top. This may involve sewing together fabric pieces, attaching photos, or appliqueing items onto the fabric.
  7. Add batting and backing: Once the quilt top is complete, layer it with batting and a backing fabric. Pin the layers together and quilt them by hand, with a sewing machine. long arm, or even bring them to a long arm quilter to be completed. Lots of options available!
  8. Make a quilt label: Your memory quilt will last for generations so let’s be sure that the memories and purpose are documented for the future! Don’t forget to include this information: Name of quilt, Name of piecer/quilter, Date quilt was completed, special notes about the person, event, or memories.
  9. Add the quilt label: In some cases the quilt label is completed and affixed prior to the quilting of the memory quilt. In other cases, you may wish to add the label directly prior to the binding or whip stitch it on after the binding. It is all a matter of personal choice.
  10. Binding: Once the quilting is complete, add binding to the edges of the quilt to finish it off.

I am super excited to be bringing this series to you and hope that you will create your own memory quilt. There are many ways to accomplish these tasks so I look forward to hearing from you with some tips and tricks!

Remember, making a memory quilt is a labor of love and can take some time and effort. Take your time, enjoy the process, and know that the end result will be a cherished keepsake for years to come.

General

Hello! Let Me Introduce Myself!

Allison of Quilt Studio 62

Hello and welcome to my blog! My name is Allison Dembek, and I’m thrilled to share my love of memory quilting with you.

I was first introduced to quilting by my grandmother and mother when I was a young girl. I was mesmerized by the beautiful patterns and intricate designs they would create with fabric, needle, and thread. Fast forward many years, and as a quilter, sewer, and machine embroiderer, I am fascinated by the idea of using fabric and thread to capture memories and tell stories. Memory quilting takes this idea to the next level, transforming old clothing, fabrics, and other keepsakes into beautiful quilts that preserve the memories and experiences of loved ones. And it does not have to be a quilt! It could be a pillow, table runner, stuffed animal, or anything that you could imagine!

In this blog, I’ll be exploring all aspects of memory quilting, from choosing the right materials and creating custom designs to stitching together cherished memories and adding personal touches with embroidery and photos. Whether you’re looking to create a quilt to commemorate a special event or to honor the memory of a loved one, I believe that memory quilting is a powerful and meaningful way to preserve and celebrate the moments that matter most. Not a quilter? I would love to collaborate with you to create a unique quilt that captures those special memories in a quilt that can be cherished for generations to come!

From sharing my own memory quilting projects to providing tips and tutorials on how to get started with your own, I hope to inspire and encourage you to explore your own creative potential and create something truly special and meaningful.

Thank you for joining me on this journey, and I look forward to sharing my many passions with you!

Foundation Paper Piecing

Lesson Learned!

Well, there is a first time for everything! I was very nervous about making this block for one of my bee mates. So nervous about the actual foundation paper piecing process that I forgot rule number one!

When I printed the pattern, I swear I chose ‘actual size’ or ‘100%’, but obviously, I did not! This block should have been 8.5″ and instead, it is 8″. Why? I went back and measured the little one inch block on the print out and guess what? It is only 7/8″.

No worries! Lesson learned and now I have a random block for a rug mug or something. I am off to start over! More to come when I get the block remade!

Happy Stitching!!